The ZR button is key for a great game time on your Nintendo Switch. But, trouble with this button can spoil your fun. We’ll guide you on how to fix issues with the ZR button on Joy-Con controllers. You’ll discover steps to check button settings, carry out important checks, and solve ZR button problems.
Understanding the ZR Button Functionality
The ZR button is vital for playing games on the Nintendo Switch. Found on the right Joy-Con, it’s used for crucial actions like speeding up in racing games. Knowing how it works helps spot problems when it doesn’t respond.
Some gamers find their Joy-Con doesn’t work right. About 30% have issues with response or odd behaviour when attached to the console. Often, dirt buildup or technical issues are to blame. Cleaning can fix half of these non-responsive cases.
Incorrect button mapping causes about 15% of these problems. Adjusting settings wrongly can make the buttons act up. Sometimes, the console recognises the controller, but some buttons won’t work.
It’s important to know that some buttons, like POWER and Volume, often don’t get tested properly. Game or app compatibility issues can also upset players.
If the ZR button isn’t working right, try updating the console or restarting it. These steps can help in about 25% of cases. These tips are key to troubleshooting and improving your play on the Nintendo Switch.
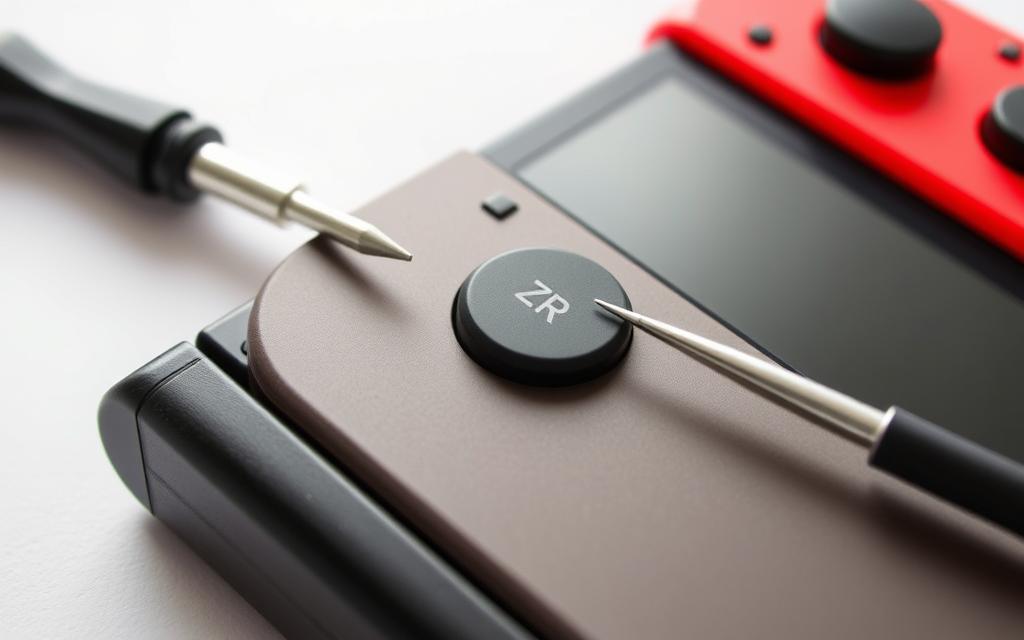
The ZR button is key for the Nintendo Switch, but it often runs into problems. Many gamers face a non-responsive ZR button, affecting their play. Dirt build-up can make buttons sticky or cause them to get stuck.
Seeing a wrench icon hints at changed button settings. This suggests it’s time for some Joy-Con troubleshooting. To fix it, gently clean around the button with a soft, dry toothbrush. Remember, never use fluids as they can harm your Joy-Con.
Dealing with ZR button problems correctly is essential for smooth gaming. If cleaning doesn’t help, it might be time to seek expert help. For professional repairs, visit Scot-Comp. They’re skilled in fixing various console issues quickly and effectively.
How to Fix Nintendo Switch ZR Button
The ZR button is key for playing games on the Nintendo Switch. When it doesn’t work right, it’s annoying. To fix it, check the button’s mapping in settings and then test the button. This helps find out if the problem is with settings or the button itself.
Check Button Mapping Settings
First, see if the ZR button’s mapping is set up right. Look in the console’s settings, shown by a gear icon. Sometimes, the problem is just that the mappings have changed accidentally. It’s also a good idea to see if game mappings need adjusting, since each game can be different.
Perform a Button Test
To really understand if the ZR button works, do a button test. Here’s how:
Open the settings on your Switch.
Choose the controller and sensors option.
Start the button test.
Note that some buttons like POWER and VOLUME are not included in this test. If the ZR button is still unresponsive after the test, it might need a fix. Use what you’ve learned to figure out if you can fix it yourself or if it needs professional help.
Step
Action
Expected Result
1
Check button mapping settings
Confirm defaults or adjust as needed
2
Initiate button test
Observe responses from the ZR button
3
Collect data on button responsiveness
Determine if manual intervention or repair is needed
Cleaning Your Joy-Con Controllers
When you take good care of your Joy-Con controllers, they work better and last longer. Cleaning them, especially around the ZR button, is crucial. This is because dirt can build up there, causing issues. If you clean your Joy-Con regularly, you can prevent many problems caused by grime.
Tools Required for Cleaning
To start cleaning, make sure you have the right tools. You will need:
Soft, dry toothbrush
Microfibre cloth
Compressed air (optional)
Small, non-abrasive cloth
Step-by-Step Cleaning Process
To clean your ZR button properly, just follow these steps. Make sure your Nintendo Switch is off first.
Turn off the console completely to prevent any unintended inputs.
With a soft, dry toothbrush, gently brush around the ZR button. Avoid using cleaners or liquids since they can cause damage.
If you want, you can use compressed air to get rid of dust in tight spots.
Then, use a small, non-abrasive cloth to wipe around the button. This gets rid of any remaining dirt.
Check the button to make sure it’s not sticky. If it is, you might need to clean it again.
Keeping your Joy-Con clean can make a big difference, especially with the ZR button. By sticking to this easy cleaning plan, you can enjoy smoother gaming.
Accessing the Internal Mechanism of Your Joy-Con
If cleaning doesn’t fix your Joy-Con’s ZR button, you’ll need to check inside. This means using a Y00 Tri-Point screwdriver to open the controller carefully. Be very precise to avoid harm to the inside parts.
With the cover off, take a good look at the inner workings. You can now see the ZR button directly. This lets you decide if you need to adjust it or replace it altogether. Sometimes, springs need realigning, or the button must be correctly positioned.
Remember where each screw goes; the bottom left screw is shorter. Knowing this makes putting it back together easier. After fixing any issues, ensure no wires are out of place. Then, you can seal the controller back up securely.
Reinstalling the ZR Button
Fixing the ZR button on your Nintendo Switch needs careful attention. You must carefully take apart the Joy-Con to fix the ZR button right. It’s important to remove parts with care, as mistakes can cause the button to not work properly.
Using the Y00 Tri-Point Screwdriver
Start by using the Y00 Tri-Point screwdriver. Remove the four screws from the Joy-Con’s back. This lets you see where the ZR button is inside. Once the screws are out, carefully take off the shell. This reveals the part you need to fix. Be gentle with the fragile ribbon cables inside. They connect the parts and need careful handling for smoother button fixing.
Placing the ZR Button Back in Position
Once inside, line up the ZR button with its slot for proper function after you put it back together. Make sure the button fits right, then reconnect the cables and put the cover back on. When reassembling, don’t tighten the screws too much. This prevents damage to the Joy-Con. By carefully following these steps, you’ll get your ZR button working again. Improve your gaming by checking out this detailed guide.
Testing the Functionality After Fixing
After fixing or cleaning Joy-Con controllers, checking the ZR button is crucial. You need to thoroughly check the ZR button and make sure it responds well during games.
Clicking the ZR Button
Begin by pressing the ZR button many times. Watch for any sticking or odd reactions. A smooth, consistent press means the button works right. It’s vital to check this first to know your fix worked.
Testing in a Game Environment
Then, test the ZR button in a gaming scenario. Turn on your console and start a game that uses the ZR button a lot. This step checks if the button does well in fast-paced game situations.
If you find problems, you might need to go back and fix them again. Keeping the ZR button in good shape helps avoid game play interruptions in the future.
When to Seek Help from Nintendo Support
If your ZR button still isn’t working right after you’ve tried fixing it, it’s time to get help from Nintendo. There are clear signs you need a pro. These include the button not responding even after you clean it and change its settings. If fixing parts inside doesn’t help, think about asking for Joy-Con repair.
Getting in touch with Nintendo’s customer service can quickly solve ongoing issues. They help organise repairs for Joy-Con controllers that can’t be fixed easily due to serious hardware problems.
Knowing when to call support can save you time and keep you from getting upset. Always keep an eye on your console and Joy-Cons. If problems keep up, don’t wait to get help from Nintendo’s experts.
Signs You Need Nintendo Support
Action Recommended
ZR button remains unresponsive after cleaning
Contact Nintendo customer service for repair
Internal repairs do not resolve the issue
Seek Joy-Con repair help
Repeated issues in multiple games
Consult with Nintendo support to identify potential hardware problems
New issues arise after a system update
Reach out for guidance on software and hardware compatibility
Button responsiveness varies unexpectedly
Test with support to determine hardware or game-specific issues
Conclusion
To fix the ZR button on your Nintendo Switch, you need to know the issues, clean regularly, and do basic repairs. This guide helps you troubleshoot and fix problems with your Joy-Con controllers. This makes your gaming better.
The repair process involves carefully taking apart your Joy-Con, dealing with screws, and handling the battery and antenna. Be sure to take care when you do this to not harm the delicate parts inside. If fixing it yourself doesn’t work, asking for help is wise. You can also get original parts from AliExpress quickly.
Choosing to repair rather than replace helps your device work again. It also helps the environment by reducing waste. There are many people and places that can help you keep your controller good as new. They’re ready for you whenever you need to play again.
FAQ
What causes the ZR button on my Nintendo Switch to become non-responsive?
A few reasons might cause this issue. Dirt or dust build-up is common. The button settings might have been changed. Also, the Joy-Con could have internal problems.
How can I clean my Joy-Con controllers effectively?
First, make sure your console is off. Use a soft, dry toothbrush to carefully clean around the ZR button. Avoid using liquids. This might make it work again.
How do I perform a button test on the Nintendo Switch ZR button?
To check the ZR button, go to the console’s settings. Press the ZR button a few times. This will show if it’s working properly or sticking.
What tools do I need to access the internal mechanism of my Joy-Con?
You’ll need a Y00 Tri-Point screwdriver for the screws. Make sure you have a clean area to work safely with all the parts.
When should I consider seeking help from Nintendo support?
If your ZR button still doesn’t work after you’ve tried cleaning, remapping, and fixing it yourself, get in touch with Nintendo’s support. They can offer more help.
How can I reinstall the ZR button after cleaning or repair?
Once clean, put the ZR button back carefully. Make sure it fits right. Then, use the Y00 screwdriver to put the cover back on. This should get it working right.
How do I identify if my ZR button settings have been remapped?
If settings change, you might see a spanner icon on your screen. This means the button mapping is different. Check your console to see any changes.
What should I do if cleaning does not resolve the ZR button issues?
If cleaning hasn’t fixed it, look at the Joy-Con’s inside for loose parts or more problems. If you’re still stuck, Nintendo support is your next step.
Controller issues can ruin your Nintendo Switch experience. This guide offers effective Joy-Con repair strategies. We’ll help you tackle drifting control sticks and connectivity problems. Joy-Con challenges often disrupt gameplay. Unresponsive buttons and wireless interruptions can turn gaming into a frustrating ordeal. Understanding potential issues is crucial for fixing Joy-Cons. We’ll explore practical troubleshooting techniques…
When your favorite game console stops working, finding a reliable repair service is crucial. Whether it’s a cracked screen, faulty Joy-Con, or battery issues, professional help ensures your device gets back to peak performance. With over 700 locations across the U.S., uBreakiFix offers walk-in convenience and same-day solutions. Their certified technicians use OEM parts for…
Is your gaming experience being interrupted by faulty Joy-Con controllers? This guide will give you reliable strategies to fix Joy-Con issues. You’ll learn about common problems and how to troubleshoot them. Our goal is to help you enjoy your Nintendo Switch without controller troubles. Nintendo has worked hard to improve controller performance. This is especially…
Is your Nintendo Switch refusing to power on? Don’t fret! This guide will help you tackle power issues head-on. We’ll walk you through diagnosing and solving problems with your stubborn console. Power troubles can stem from various sources in these complex devices. Be ready to try several fixes before considering professional help. Understanding proper battery…
Is your Nintendo Switch acting up? Don’t worry, there are plenty of repair options available. Professional services can quickly fix various issues, from battery problems to screen damage. uBreakiFix by Asurion offers over 700 locations across the country. This makes finding a repair shop for your gaming device easier than ever. Most authorised centres can…
Many gamers face issues when their console fails to read physical game cards. Error messages like “The game card could not be read” or “There is nothing inserted in the game card slot” can be frustrating. These problems occur across all models, including the Original, Lite, and OLED versions. Avoid blowing into the slot—moisture can…