If you’re having trouble with your Nintendo Switch joystick, this guide can help. It’s aimed at those dealing with Joy-Con drift. We’ll show you the signs to look out for, like unwanted movements in games. You’ll also learn about what causes drift and when to repair or replace your joystick.
Fixing your controller can save money, as new Joy-Cons are pricey. This guide includes step-by-step instructions, the tools you need, and tips for keeping your controller in top shape. Though it may seem hard at first, with the right tools and some patience, you can fix joystick problems.
Understanding Joy-Con Drift
Have you ever played on your Nintendo Switch and noticed something off? That’s likely Joy-Con drift. It’s a big problem. It makes your game do things you didn’t tell it to. Knowing about Joy-Con drift helps find solutions.
What is Joy-Con Drift?
Joy-Con drift is when the Nintendo Switch joystick moves by itself. No one’s touching it, but things on the screen start moving. This can really mess up your game.
Common Causes of Drift
Joy-Con controllers are compact but face issues. What causes Joy-Con drift?
Wear and Tear: Playing a lot wears them down.
Dust and Debris: Dirt can block the joystick’s move.
Environmental Factors: Changing weather affects it too.
More people noticed drift during the pandemic. Everyone was gaming more with their Nintendo Switch and Switch Lite.
Spotting problems early saves trouble. When does a Joy-Con need fixing?
If the joystick doesn’t react like it should.
When it sticks or won’t go back to the middle.
Seeing movement on your screen when you didn’t do anything.
Why Would I Need to Replace the Joysticks?
Joy-Con controllers are made up of many parts like joysticks, buttons, and circuit boards. These parts are key for a great gaming time. The joystick, being complex, often gets worn out, leading to problems.
Components of Joy-Con Controllers
Joy-Con controllers have many important parts. The joystick is essential for game control. Buttons and circuit boards also play a big role. Using them a lot can wear them out, affecting how well you play games.
Wearing Out of Parts and Accumulation of Debris
Using the joystick a lot can make it wear out. Dust and debris can make this worse. This means you might need to replace the joystick. The Joy-Con’s tight design makes it easy for dirt to get inside. Knowing when they’re getting bad is key for good game play.
For help with joystick issues, visit the official Nintendo page here. Also, Scot-Comp can fix complex problems. They work with different consoles, including the Nintendo Switch. Find out more on their site here.
Tools Required for the Repair
To fix a Joy-Con correctly, you need the right tools. Knowing what tools are needed helps make taking it apart and putting it back together easier.
Essential Tools for Joy-Con Repair
For Joy-Con repair, you’ll need:
1.5mm Tri-Wing Screwdriver
2.0mm Phillips Head Screwdriver
Plastic Prying Tool
Needle-Nose Tweezers
These tools are crucial for working with the screws and parts during disassembly.
Optional Tools to Make the Job Easier
Some optional tools can help with the repair:
Magnetic Project Mat – $19.95
Soft-Bristle Toothbrush – for cleaning dust
A magnetic project mat keeps screws in place, so you don’t lose them. A soft-bristle toothbrush works well for cleaning the joystick and electric parts. It keeps dust and dirt from messing up the Joy-Con’s function.
Tool
Purpose
Price
1.5mm Tri-Wing Screwdriver
Unscrewing the Joy-Con casing
Varies
2.0mm Phillips Head Screwdriver
Removing internal screws
Varies
Plastic Prying Tool
Safely opening the Joy-Con
Varies
Needle-Nose Tweezers
Handling small components
$4.99
Magnetic Project Mat
Organising screws
$19.95
Choosing the right tools is key for a trouble-free repair. Being ready helps a lot when you need to fix the joystick on the Nintendo Switch’s Joy-Con.
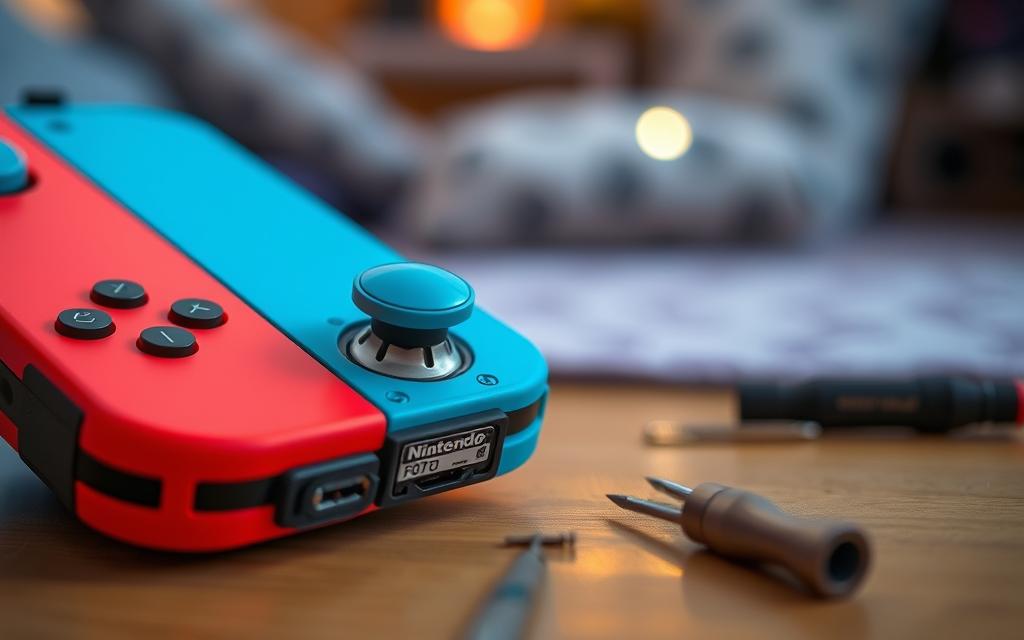
How to Fix the Joystick on a Nintendo Switch
To fix the Nintendo Switch joystick, start with the right tools. You’ll need a Y00 screwdriver, JIS 000 driver, tweezers, and a Magnetic Project Mat. Follow the steps to fix Joy-Con closely to repair your Joy-Con joystick without harming your device.
First, take off the back panel. This means unscrewing 10 screws. Handle ribbon cables and connectors with care to avoid damage. Remember to be careful throughout taking it apart.
In the European Economic Area (EEA), UK, and Switzerland, Nintendo fixes Joy-Cons for free. This is true for problems due to defects or wear and tear. For issues with Nintendo Switch Lite’s control sticks, try some troubleshooting before thinking about replacing or fixing them.
Watch out for problems from third-party accessories. If your Switch has unauthorised changes, accidental harm, or damage from business use, Nintendo might not fix it for free. Keep your software updated to avoid gameplay issues, like those seen in Mario Kart 8 Deluxe.
Follow these steps to fix Joy-Con with care. Make notes and handle everything properly. Being patient is key, as fixing the joystick right takes time.
Step-by-Step Guide to Disassembling Your Joy-Con
Taking apart Joy-Con controllers can be easy with the right steps. We’ll show you how to remove the Joy-Con’s back panel. This is key to reaching the parts inside that might need fixing.
Removing the Back Panel
Start by taking out the four Tri-Point Y00 screws from the Joy-Con’s back. It’s critical to keep these screws safe for later. Then, gently use a plastic tool to pry the panels apart at the bottom edge. Move the tool up slowly, avoiding too much force to separate the panels easily.
Accessing Internal Components
With the back panel off, you can open the Joy-Con like a book. Watch out for the fragile cables linking the charging rail to the motherboard. Also, use a spudger to unhook the battery connector. This stops the device from turning on by accident during your work and keeps the circuits safe.
Component
Details
Tri-Point Screws
4 screws for back panel removal
Battery Compartment
3 Phillips screws to access
Thumbstick
2 screws hold it in place
Reassembly
4 Tri-Point screws used for putting the Joy-Con back together
Replacement Parts
Replacement thumbsticks are inexpensive and readily available online
Replacing the Joystick
Changing the joystick on your Nintendo Switch Joy-Con might look tough, but it’s doable with effort. We’ll cover the key steps needed to swap out the joystick connection successfully.
Identifying the Joystick Connection
First, open your Joy-Con and find the joystick’s connection. It’s held in place by a ZIF connector for stable gameplay. You’ll need to carefully remove this connector to start the replacement.
Removing the Old Joystick
Use a JIS #00 screwdriver to take out the two 3.5 mm Phillips #00 screws holding the joystick. Be gentle with the nearby parts when doing this. After unscrewing, lift the joystick out carefully to avoid harming other components.
Installing the New Joystick
Once the old joystick is out, place the new one where it should go. Use the same screws to secure it. Then, carefully reattach the ribbon cables, making sure they click into their correct spots. This ensures your Joy-Con’s joystick connects well and works as it should.
Reassembling Your Joy-Con
Reassembling your Joy-Con controllers with care is vital. This ensures all parts work well together. It also keeps the device in good shape.
Reinstalling Internal Components
Start by placing each component back in its spot. Make sure connectors and ribbons are plugged in right. A tight fit stops problems when you use it. Double check everything is lined up well.
Sealing Up the Back Panel
Now, fit the back panel onto the Joy-Con body. Use the four Tri-Point screws you took out earlier. Remember the order to put the screws back to avoid mix-ups. Sealing it right keeps out dust and prevents damage. This step helps keep your controller working well.
Step
Description
Tools Needed
1
Position internal components correctly.
None
2
Plug in connectors and ribbons securely.
None
3
Align the back panel with the Joy-Con.
None
4
Secure the back panel with Tri-Point screws.
Tri-Point screwdriver
Calibration and Testing
After you put a new joystick in your Nintendo Switch, it’s key to calibrate the Joy-Con properly. This makes sure it performs well. It fixes any wrong joystick movements and makes gaming better.
Using the Calibration Tool on Nintendo Switch
Turn on your Nintendo Switch and go to the settings. Look for ‘Controllers and Sensors’ to find the calibration tool. Follow the steps to calibrate your new joystick. This gets rid of alignment issues, so your game input is spot on.
Checking for Proper Functionality
After calibrating, test the Joy-Con in a game. Choose a game that uses the joystick and see how it reacts. Watch for any drift or stickiness that might still be there. Good functionality means smooth moves without unwanted commands.
Keep checking and looking after your Joy-Con controllers to stop problems later. By calibrating and testing your joystick often, your gaming will always be smooth.
Preventative Measures for Future Issues
Being proactive can greatly improve how long your Joy-Con controllers last, making gaming more fun. Simple upkeep and cleaning stop joystick problems before they start. Here are key tips to keep your Joy-Con controllers and Nintendo Switch working their best.
Maintenance Tips for Joy-Con Controllers
Checking and adjusting your Joy-Con controllers regularly is key. Watch for the first signs of drift. Catching it early usually means easier fixes. Here are more tips to keep your Joy-Con controllers in good shape:
Use protective accessories, like Joy-Con covers, to avoid damage.
Don’t push too hard when playing to prevent wear and tear.
Keep your console and controllers in cases to stop hits and drops.
Check often for and clean off any dirt build-up.
Cleaning Your Nintendo Switch Regularly
Regularly cleaning your Nintendo Switch should be routine. A gentle wipe of the console and controllers stops dust from messing with sensors. Follow these cleaning tips for best results:
Use a soft, dry cloth for wiping off dirt.
Keep moisture away from buttons and tight spots.
Look for and gently clean dirt in the joystick areas with isopropyl alcohol when necessary.
Following these maintenance and cleaning guides will keep your Joy-Con controllers working well for longer. Your effort in keeping them clean will pay off, reducing problems and boosting your gaming fun.
Conclusion
This article gave a thorough look at how to fix Joy-Con issues. It covered using the right tools, being careful, and keeping your gaming gear in good shape. Fixing Joy-Con drift by yourself saves money and makes your equipment last longer.
Some repairs are easy to do at home, but it’s wise to get help for tough problems. Getting a pro ensures your Nintendo Switch is in good hands. Knowing how to fix things can make your gaming better and prevent common issues.
Following the maintenance advice from this article can help you dodge future problems with the joystick. These tips will help you take great care of your Nintendo Switch. Enjoy your games without any hitches.
FAQ
What is the most common issue with Joy-Con controllers?
The most common issue is Joy-Con drift. This happens when the joystick moves characters on-screen without the user touching it. It can make games hard to play.
How can I tell if my joystick needs to be replaced?
You might need a new joystick if it doesn’t respond well, feels stuck, or moves by itself in games.
What tools do I need to repair my Joy-Con?
You’ll need a 1.5mm tri-wing screwdriver, a Phillips head screwdriver, and a plastic prying tool. Needle-nose tweezers, a magnetic mat, and a soft toothbrush are also useful.
Is it difficult to replace the joystick on a Joy-Con?
Replacing the joystick is pretty simple, but take care. You need to be patient and careful not to hurt the Joy-Con’s inside parts.
What should I do to maintain my Joy-Con controllers?
Keep your Joy-Cons working well by calibrating them regularly. Use a soft cloth for cleaning to stop dust from causing joystick problems.
How do I calibrate the new joystick after replacement?
To calibrate the new joystick, turn on your Nintendo Switch. Then in the settings, choose ‘Controllers and Sensors’ to find the calibration tool.
Can I clean the inside of my Joy-Con while I repair it?
Yes, you can. A soft-bristle toothbrush is perfect for removing dust from around the joystick and other parts during the repair.
What should I do if the joystick still drifts after replacing it?
If it still drifts, double-check your work to make sure everything’s connected right. If problems continue, you might need to get professional help.
The Nintendo Switch Lite is loved by gamers for being easy to carry around. It’s great for playing games on the go. However, it can face problems just like any gaming device. This guide will look at common issues with the Nintendo Switch Lite. We will cover how to fix these problems so you can…
Controller issues can ruin your Nintendo Switch experience. This guide offers effective Joy-Con repair strategies. We’ll help you tackle drifting control sticks and connectivity problems. Joy-Con challenges often disrupt gameplay. Unresponsive buttons and wireless interruptions can turn gaming into a frustrating ordeal. Understanding potential issues is crucial for fixing Joy-Cons. We’ll explore practical troubleshooting techniques…
Nintendo Switch fan noise can ruin your gaming fun. It turns peaceful play into a distracting mechanical racket. Understanding console cooling systems is key for top performance. Fan noise isn’t just annoying. It’s a warning sign of possible hardware problems. Odd sounds from your Switch mean it’s time to check things out. The right approach…
Is your Nintendo Switch refusing to power on? Don’t fret! This guide will help you tackle power issues head-on. We’ll walk you through diagnosing and solving problems with your stubborn console. Power troubles can stem from various sources in these complex devices. Be ready to try several fixes before considering professional help. Understanding proper battery…
The ZR button is key for a great game time on your Nintendo Switch. But, trouble with this button can spoil your fun. We’ll guide you on how to fix issues with the ZR button on Joy-Con controllers. You’ll discover steps to check button settings, carry out important checks, and solve ZR button problems. Understanding…
Is your Nintendo Switch acting up? Don’t worry, there are plenty of repair options available. Professional services can quickly fix various issues, from battery problems to screen damage. uBreakiFix by Asurion offers over 700 locations across the country. This makes finding a repair shop for your gaming device easier than ever. Most authorised centres can…